Matching Your Camera to Your Optics
by Douglas George
In order to get the best results from your equipment, it is important to match the resolution of your camera to the resolution of your optics.
In conventional photography your lenses are highly adaptable, with adjustable f/ratio and often zoom capability (adjustable focal length). On dedicated science instruments such as telescopes and microscopes you are much more limited by the optics, and you need to pick your camera to suit your optics. The key parameter is the physical size of the pixels, which may range from less than 1 micrometer (micron) across for a cell phone camera, to as much as 25 microns for large specialty scientific imagers.
There are a variety of ways to characterize the resolution capability of optics. One of the most straightforward is to determine its response to a perfect point source – the resulting image of a perfect point is called a “point-spread function” or PSF. In general, larger diameter optics provide more resolution, while shorter f/ratio optics produce smaller spot size.
Astronomers have it easy because they have a universe of perfect point-spread functions all around them. Stars are so remote, compared to their diameter, that they appear as perfect pointlike sources. It is straightforward to evaluate the resolution performance of an astronomical telescope. In a laboratory setting you may have to resort to specialized test equipment or work with theoretical numbers.
Astronomers have a difficulty, though, which is called “seeing”. The atmosphere is comprised of cells of warmer and cooler air, which are constantly circulating due to convection. Warm air rises; cool air falls. Since cool air is denser it also has a higher refractive index. The atmospheric bubbling of warm and cool cells affects the path of light through the atmosphere in a random fashion, causing starlight to wander rapidly. For very small optics this just makes the star images wander about; for larger optics you will get multiple cells within the light path, resulting in the star image breaking up and moving in multiple directions at once. Tip/tilt guiders such as the SBIG AO-X can improve resolution by removing seeing-related image wander; large telescopes (above 1 meter diameter) can use advanced adaptive optics systems with wavefront sensors and “rubber mirrors” to tighten the images.
For small telescopes, and in laboratory settings, the optics dominate. Assuming the optics are working to their full potential, the spot size is determined as follows:
Spot size (um) = 1.22 * wavelength (um) * f/ratio
(1/2NA should be used instead of f/ratio when focusing closer than infinity.)
At a typical green wavelength of 0.550 microns, an f/5 system will produce a spot 3.4 microns in diameter. Clearly this requires a small pixel to sample adequately.
When atmospheric seeing is taken into account, the spot size is often much larger. If you are at a premier observing site, such as the summit of Mauna Kea, the long-exposure seeing disk can be less than 1 arc-second. At most non-alpine locations seeing disks of 2 arc-seconds are only seen on the most exceptional nights. Such a site will typically have seeing on the order of 2.5 to 3.5 arc-seconds, depending on the weather conditions.
How large a spot this produces on the sensor depends on the focal length of the instrument, not the focal ratio. A handy formula is:
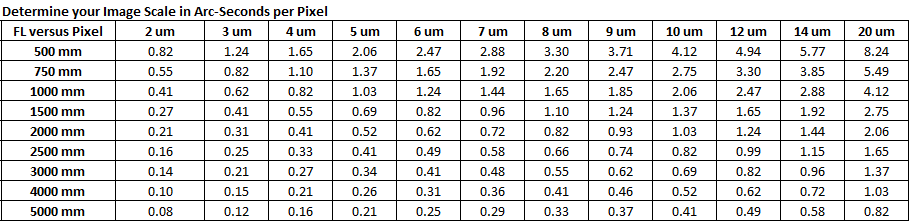
Pixel Size (arc-seconds) = 206 * Pixel Size (microns) / focal length (mm)
A camera with 9 micron pixels attached to a telescope with a 2000 mm focal length will result in 0.9 arc-seconds per pixel.
Nyquist Sampling Criterion
In order to perfectly replicate an image, you need to sample at least 2X the highest spatial frequency in the image. This Nyquist Sampling Criteria has been mathematically proven to record all the information present in the image. Unless you are doing profile-fitting photometry, where you need to measure the shape of the PSF accurately, it is usually sufficient to use 2 pixels across the FWHM of the star. In practice pixels are square and the star images are round, so 2.5 to 2.8 pixels is generally considered optimal. Increasing beyond this point does not increase the image detail; however, it does spread the light out and can reduce the signal-to-noise ratio. Spreading the same light among more pixels increases noise because each pixel has its own noise contribution.
Recommendations
In practice, you want an absolute minimum of 2 pixels across the FWHM; 2.5 to 3 is an excellent match, and up to 4-5 will produce good results. It may be advantageous to lean towards a higher number, so that on those rare nights of excellent seeing you can take full advantage of the conditions.
You should also consider the field-of-view of your system. If you take the pixel size in arc-seconds and multiply by the number of pixels, that gives you the field of view the camera sees.
The first step is to determine your images scale in arc-seconds per pixel. This table will help you do that. Look up your telescope’s focal length on the left, and your camera’s pixel size along the top. That will give you the image scale in arc-seconds per pixel. (Or use the above formula.)
Now we can determine how that matches with your observing conditions. Across the top of the second chart is your FWHM seeing disk. The range of “Excellent” to “Fair” represents typical seeing that we have in the Ottawa, ON region where our office is located. Your local conditions may be better or worse than this. The chart gives you the number of pixels across the FWHM of a star image. Remember, for good resolution imaging we need at least 2 and preferably 2.5 to 2.8, but no more than about 5 pixels across the FWHM.
Red indicates poor matching. At the top of the chart, your stars will be undersampled, resulting in a loss of resolution and square stars. At the bottom of the chart, your star images will be large blobs; in other words, oversampling. Oversampling results in an unnecessary loss in signal-to-noise ratio.
White squares indicate acceptable matches. Green indicates a very good match.
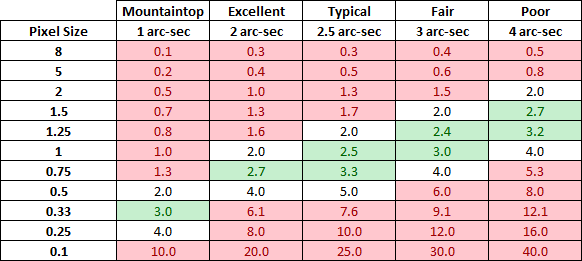
What is immediately obvious is a larger telescope tends to have a longer focal length, and thus requires larger pixels. Conversely small telescopes are better suited to small pixel cameras. This is one reason why we offer a range of different camera models with different sensor characteristics.
One other thing to consider: in some cases you may want to deliberately violate these “rules”, if resolution is not your primary concern. If you need to cover a large area it may be sensible to deliberately undersample. Doing this makes the camera more sensitive to distributed sources such as nebulae. It should be noted that once a star is reduced below the size of a single pixel, it is not going to become any brighter by shrinking it further. Undersampling will emphasize distributed detail in comparison to star images. The concept of “fast” f/ratios producing brighter images only applies to distributed sources.